Showing posts with label bracelets. Show all posts

Sunday, May 6, 2012

Perler Bead Bracelet Patterns

DSC_0673
Remember these?
DSC_0672
Time to share a few patterns...
The following patterns are really just patterns as in which color bead to use when in order to get a certain picture. For a more detailed tutorial on how to weave a bracelet with fusible beads go here

Notes for understanding the pattern: the directions left to right/ right to left (l-r)/(r-l) refer to the working direction while you weave. In the pictures below l-r would be top to bottom, r-l bottom to top. Each bracelets start with a row of 4 beads, but every other row only adds 2 beads to the bracelet. You can see why in the tutorial.
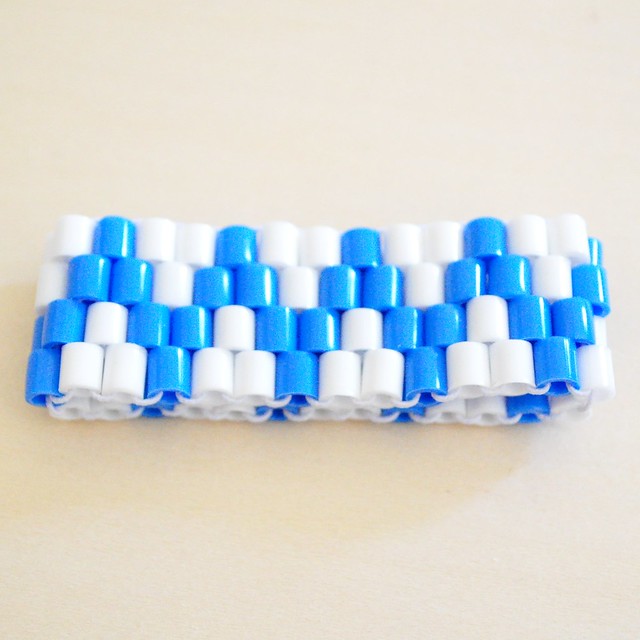
DSC_0614SIMPLE ZIG ZAG

start row (l-r): white (w), w, blue (b), b
2nd (r - l):  w, b
3rd (l - r): b, w
4th (r - l): w, b
5th (l - r): w, b
6th (r - l): b, w
7th (l - r): w, b

repeat rows 2-7 until you reach desired length (for toddler sized bracelets about 9 times). At your last turn do only rows 2-5 to match up the pattern with the beginning of the bracelet.

DSC_0613
GREEK KEY (well, sort of...)


start row (l-r): red (r), yellow (y), r, r
2nd (r-l): r, y
3rd (l-r): r, y
4th (r-l): r, r
5th (l-r): r, y
6th (r-l): r, y
7th (l-r): r, r

repeat rows 2-7 until you reach desired length (for toddler sized bracelets about 9 times). At your last turn do only rows 2-5 to match up the pattern with the beginning of the bracelet.

DSC_0629HAPPY DAISY

start row (l-r): 4 green (g) beads
2nd (r-l): g, w
3rd (l-r): w, w
4th (r-l): g, y
5th (l-r): w, w
6th (r-l): g, w
7th (l-r): g, g
8th (r-l): g, g
9th (l-r): g, y
10th (r-l): y, y
11th (l-r): g, w
12th (r-l): y, y
13th (l-r): g, y
14th (r-l): g, g
15th (l-r): g, g

repeat  rows 2-15 until you reach desired length of bracelet ( for toddler size 4 times). At your last turn repeat until row 13 only to match up with the beginning of the bracelet.

Looks fun? My daughter loves to wear these. Most girls that have seen them want to learn how to make a bracelet...  and really once you get the hang of it, it's about 30 minutes work from start to finish for a kid size bracelet. I got a few more patterns in my mind that need to be made... so look forward to some more bracelets on the blog in the near future.

Please feel free to ask questions in the comments if the pattern doesn't make sense to you. It was my first time trying to write down a pattern for a beaded bracelet, so it's kind of experimental and I am open to suggestion on how to make it clear for everyone!

Saturday, April 21, 2012

Beaded Bracelets

DSC_0675

I recently read over at ikatbag about her daughters' love for Perler beads and it brought back childhood memories. As a child I especially loved a coaster at my grandpa's house that was woven from beads the same size as Perler (or Hama or IKEA PYSSLA) but they were made form ceramic or glass, not plastic. It was a beautiful coaster. Anyways, my 2 year old loves beads at the moment and I just kept thinking of patterns for woven bead projects, so we got a box of fusible beads (and some peg boards, too) from IKEA and I started out on some simple bracelets. The weaving technique is also found on the Perler/Hama website, but there it's not well explained. So here a little tutorial. I think this craft is suitable for kids from age 6 years or older depending on craft skill level and patience ;-).

DSC_0599STEP 1:
Tie a bead (I use a different kind bead so it's obvious) as a stopper to one end of your string/elastic thread).

Add 4 beads (or any even number beads)  to the string.

Note: If you use an odd number beads the pattern will not work out, there is a way to weave with an odd number, but it's a bit more difficult and can be confusing for beginners or young children. You can use any even number, for a bracelet, this will define the width of your bracelet, 4 is a pretty good size for kids arms. You can use this technique for any size projects, 12-16 beads for coasters, or even 50 beads or more for placemats.

DSC_0601STEP 2: 
 Add another bead and put the string through the 3rd bead of the first row.


DSC_0603STEP 3:
Add one bead and put the string through the first bead of the first row.

(You can totally do Step 2&3 in one step, I just separated it for clarity, this is how the kids I did this with understood)


DSC_0604

STEP 4: 
Pull tight. Now you have the basic set-up for the weave pattern.
1-2-1-2 or low-high-low-high.


DSC_0608
STEP 5:
Add a new bead at the low position and pull the string through the blue bead (high) of the last row. Repeat.

Got it? Always add a bead to the low position and pull string through the high of the last row. For a 4 bead wide bracelet you will add 2 beads with each row, switching direction from left-right to right-left and back...


DSC_0611 TIP:
It's much easier and quicker to do this with a needle, as you can see in the picture to the left.

You should pull tight after every row, but you can loosen up the last row a bit to make it easier to put the string through the beads, this is especially helpful if you (or your kids) do this without a needle.


HOW TO FINISH THE BRACELET?

bracelet
Once you bracelet is long enough and both ends fit together like a zipper, simply weave both ends together by going back and forth between one end and the other (see middle picture above.) Tie both ends of the elastic together, cut off the stopper bead and weave a bit of the long end back into the bracelet. you can pull and stretch the bracelet a bit so the knot will not be exposed on the side of the bracelet but hidden inside a bead.

Here a few bracelets I made for my baby... patterns & more coming soon. (Edit: Patterns for the bracelets are found here!)
DSC_0672

DSC_0673


Related Posts Plugin for WordPress, Blogger...