Thursday, May 31, 2012

Week 29: Maternity Tankini (& some sewing tips)

There it is, my first homemade swimsuit. Or a maternity tankini, to be exact.

maternity swimsuit

I love how it turned out, and believe me, it was much easier than one would think. And when I knew I would have a summer pregnancy and started looking around for maternity swimsuits, I could only find really ugly or really expensive ones. And since the price for this pretty spandex fabric was 5 bucks for the meter... there was no way I would pay 100 bucks for a pretty swimsuit I would only wear 3 months max. There is nothing to be afraid of when it comes to sewing a swimsuit, and you don't even have to buy a pattern to get this fabulous look. Since it was the first time for me to make a swimsuit, I didn't think to take pictures of the whole process, so I can't offer you a step-by-step tutorial, but I'll share some stuff I learned along the way:

Cutting/Pattern:
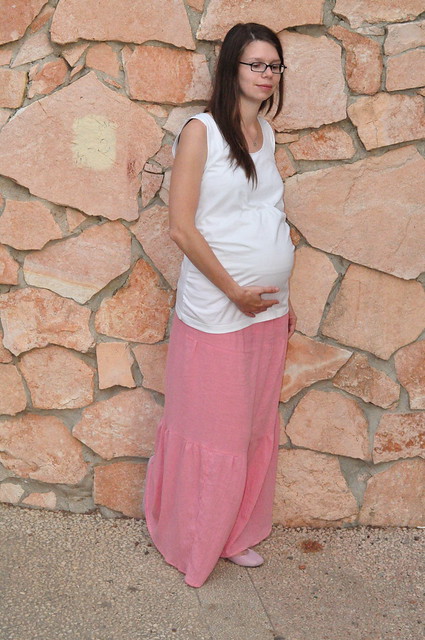
- I used the pants of a regular swimsuit as a pattern for the new one and I used a regular stretchy tank top that still fit me at 28 weeks for the top (I only had bikinis - so no actual old swimsuit to use as a pattern for the maternity one) To make the top maternity and actually fit around the belly, I simply added a tad bit extra to the width and about 10 cm/4 inches extra length to the bottom of the front piece (see pictures below) I also made the straps wider because I like it better.
-I needed only half a meter of 120cm wide fabric for this swimsuit, but you may need more.I am pretty small as you can see.
Maternity Tankini
longer front piece and straps

Maternity Tankini
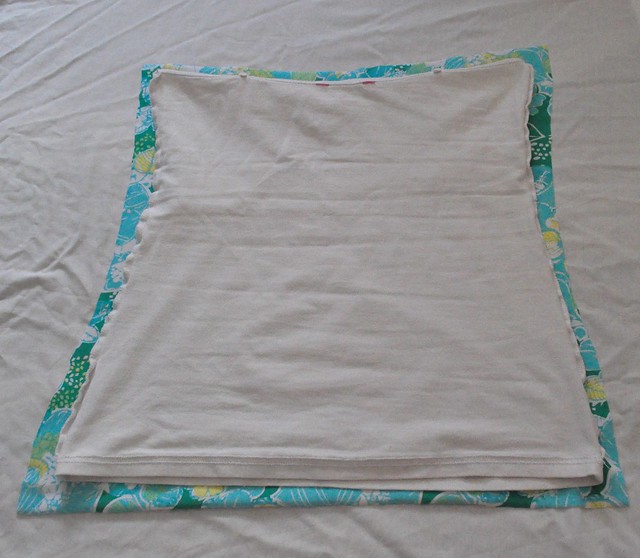
back piece, normal length

Sewing - set up:
-before actually sewing my swimsuit I cut a small pair of swim pants for my 2 year old daughter to do a little test sewing to get the feel for spandex fabric. I tried different stitches (straight, narrow zigzag) to find the best settings for my sewing machine. I used the narrow zigzag stitch with relative short stitches (2 or 2,5 I don't remember) and a 75 ball needle. I also used the build in walking foot on my Pfaff, but this is not a requirement. You can totally do it without a walking foot. The test sewing was a good thing to do because it really gave me the feel for the fabric and I learned that pinning is a good thing to do because two layers of spandex are pretty slick. If you don't have a two year old who could use a pair of swim pants, you can just use a scrap and sew a few lines with different stitches to see which will work best.

Sewing -:
-sew front and back piece of the pants together, hem all edges. You can add lining to the pants if you want to but I didn't it is just fine.
-for the top, I first sewed the straps to the front piece
-next I hemmed the bottom of the back and front piece as well as the neckline including the straps. You could do this later also.
-then I sewed a basting stitch (straight stitch, length 6) from below the bust to the bottom hem on both sides of the front piece in order to gather up the extra length around the belly area.
-next I pinned the front piece right sides together with the back piece - first pinning the upper bust area straight in place as well as the bottom hems. Than I evenly spread the gathers around the belly area and pinned them in place and sewed everything together. After everything was sewn in place I removed the basting stitches (be careful with a seam ripper on spandex) I just pulled it out by hand.
-if you want a basic halter neck  top you are done now, if you want actual straps put on the top and get somebody to pin the straps in place on the back piece. Than sew in place. I intended to have regular straps, but than I liked the halter neck version, so I ended up leaving the straps attached only to the front piece.

-if you like to create a ruffled bust piece (like I did) you'll need to cut an extra strip of fabric to make the cord and a rectangle about 3 x 10cm/1,5 x 4 inches. (You might need a longer rectangle if you have larger boobs and your bust piece is longer.) Fold your top to find the middle of your front piece and attach the rectangle to it with 3 straight lines - one in the middle that lines up with the center of the top and one on each long side, leave top and bottom of the rectangle open. You should have two small tunnels on the inside of your top. To create the cord just stretch a strip of spandex fabric until it rolls up. Insert the cord into the tunnels so both ends of the cord are coming out on the top (one end from each tunnel). As you can see below, I didn't sew all the way down on the middle seam, so the cord is hidden under the rectangle piece.  I added plastic beads to the ends of the cord and tied a knot just for a pretty detail. Now when you pull on both ends of the cord your bust piece should ruffle up, you can adjust this according to your liking. Pretty simple thing to do to create a cool detail on any swimsuit.
DSC_0904
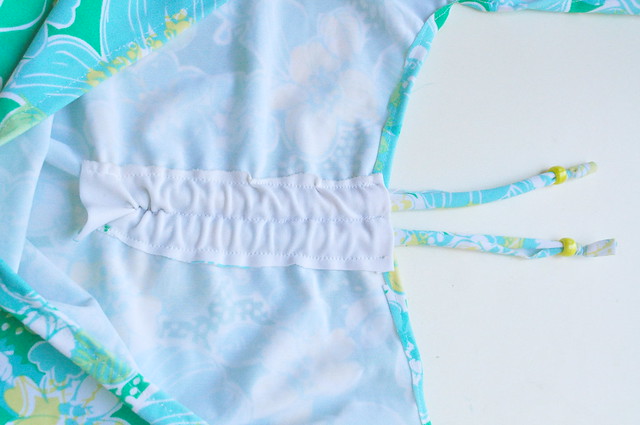
the tunnel with cord


Oh, one more thing. I didn't iron at all in this project, since spandex can only be ironed on very low temperature it didn't really have a visible effect. I just pinned a lot more than usual to keep things in place while sewing hems and stuff.

Overall feeling: I loved sewing with spandex fabric, even though it seemed tricky at first. It doesn't fray, so you could easily leave raw edges if you like that (I might actually do that with a second pair of pants for this swimsuit). And it is forgiving and lovely stretchy. And just so much cheaper than buying swimsuits. Now off to spend the summer at the beach!

maternity swimsuit

Sunday, May 27, 2012

Week 27 & 28: Tiered Skirt and Simple Maternity Top


DSC_0903

Technically I am now 29 weeks, but heck, I've been sewing a lot clothes lately (mainly because I owned hardly anything that fit me anymore...) But between sewing, wearing and washing not much photographing took place. So here two late projects... the tiered skirt in a lovely coral colored lightweight super soft fabric that is a dream to wear in the summer but not so much a dream to sew with. It's woven pretty loosely and frays like hell... if you need to use a seam ripper you might as well just cut of the seam incl. fabric with scissors. Anyways I like the skirt!

For the top I harvested some fabric from leftover XL T-shirts. I used a top that fit me for orientation but made the front piece about 10cm/4 inches longer than the back so I could ruffle it a bit for a better fit around the belly. It has still room to grow which I will need...

Tuesday, May 8, 2012

French Memo Board

I found another use for my beautiful apple fabric that just makes me happy when I look at it: a French memo board for my kitchen. I used an old canvas, sewed two pieces of fabric together, stapled them on and added some ribbon. I hand sewed some buttons on and that's almost it... Now I finally have a place to put some of our pretty postcards and wedding invitations.
 
DSC_0810
apples, gingham and big buttons, what more could one want?
The canvas I had sitting around was quite large, so I decided to divide it up a bit and add some handy features on the bottom part that are not typically included in the French memo board.... like a "clothes line" to hold some note pad or take out menus and stuff like that. It's just a piece of ribbon with some clothes pins on it. I stitched it through the cover fabric and canvas with  a large needle and tied a knot on each side of the line on the back of the canvas.

DSC_0808
the "clothes line"

I also sewed two pockets on the gingham fabric efore stapling it to the frame, one I left as it is to hold some note paper and one I divided up in smaller sections to hold pens and scissors.


DSC_0812
some pockets sewn on to hold pens and scissors

 And that's it - my new French memo board.

DSC_0807
French memo board with some handy organizing features...


Sunday, May 6, 2012

Perler Bead Bracelet Patterns

DSC_0673
Remember these?
DSC_0672
Time to share a few patterns...
The following patterns are really just patterns as in which color bead to use when in order to get a certain picture. For a more detailed tutorial on how to weave a bracelet with fusible beads go here

Notes for understanding the pattern: the directions left to right/ right to left (l-r)/(r-l) refer to the working direction while you weave. In the pictures below l-r would be top to bottom, r-l bottom to top. Each bracelets start with a row of 4 beads, but every other row only adds 2 beads to the bracelet. You can see why in the tutorial.

DSC_0614SIMPLE ZIG ZAG

start row (l-r): white (w), w, blue (b), b
2nd (r - l):  w, b
3rd (l - r): b, w
4th (r - l): w, b
5th (l - r): w, b
6th (r - l): b, w
7th (l - r): w, b

repeat rows 2-7 until you reach desired length (for toddler sized bracelets about 9 times). At your last turn do only rows 2-5 to match up the pattern with the beginning of the bracelet.

DSC_0613
GREEK KEY (well, sort of...)


start row (l-r): red (r), yellow (y), r, r
2nd (r-l): r, y
3rd (l-r): r, y
4th (r-l): r, r
5th (l-r): r, y
6th (r-l): r, y
7th (l-r): r, r

repeat rows 2-7 until you reach desired length (for toddler sized bracelets about 9 times). At your last turn do only rows 2-5 to match up the pattern with the beginning of the bracelet.

DSC_0629HAPPY DAISY

start row (l-r): 4 green (g) beads
2nd (r-l): g, w
3rd (l-r): w, w
4th (r-l): g, y
5th (l-r): w, w
6th (r-l): g, w
7th (l-r): g, g
8th (r-l): g, g
9th (l-r): g, y
10th (r-l): y, y
11th (l-r): g, w
12th (r-l): y, y
13th (l-r): g, y
14th (r-l): g, g
15th (l-r): g, g

repeat  rows 2-15 until you reach desired length of bracelet ( for toddler size 4 times). At your last turn repeat until row 13 only to match up with the beginning of the bracelet.

Looks fun? My daughter loves to wear these. Most girls that have seen them want to learn how to make a bracelet...  and really once you get the hang of it, it's about 30 minutes work from start to finish for a kid size bracelet. I got a few more patterns in my mind that need to be made... so look forward to some more bracelets on the blog in the near future.

Please feel free to ask questions in the comments if the pattern doesn't make sense to you. It was my first time trying to write down a pattern for a beaded bracelet, so it's kind of experimental and I am open to suggestion on how to make it clear for everyone!

Wednesday, May 2, 2012

Doll Stroller Re-Do

DSC_0767


You know those cheap-o doll strollers. The fabric and make is so cheap it breaks easily, especially if some 2 year old keeps sitting in it... and since we like recycling and sewing over here, it simply wasn't an option to throw the perfectly good frame out after the fabric part ripped. My friend - the seam ripper - helped me take the old thing apart completely to use as a pattern. I used a cotton fabric that will hopefully last longer than the original. For straps I used ribbon I had laying around the house, it wasn't the best choice but does the job. I would have bought something different but had no time to run to the store, because the baby was begging me to get her stroller back to be usable!

DSC_0765


P.S.: There are a few tutorials for similar projects online... one is over here!
Related Posts Plugin for WordPress, Blogger...